
Did you know about wet wood disasters? It can destroy your whole project! It will not adhere to paint layers. It will damage wood outlook and many more.
How to avoid this?
The simple answer is to Wait, Wait, and wait until the wood dries up.
A question arises here, how long do you have to wait. This article will focus on this topic.
How long to wait before staining pressure-treated wood?
You may have to wait from four weeks to six months before staining pressure-treated wood. However, this time may increase from four weeks to one month depending on factors like the type of treated wood used, humidity level, and temperature.
Wood is an extremely porous material. It is likely to absorb moisture more quickly. To protect lumber, it is passed through certain preservatives under pressure. After this, it becomes available to be sold in markets. But it is still wet. In this condition, it would not adhere to paint layers. When to paint then?
Keep reading to know the answer!
What Is Pressure Treated Wood?
Pressure-treated wood is lumber that has been infused with chemicals to protect it from rot, insect damage, and fungal decay. The process of pressure treating involves using a high-pressure infestation to force the chemicals deep into the wood fibers. This treatment can extend the life of your wooden structures by several years, making it an excellent choice for outdoor projects such as decks, fences, and playground equipment.
Why Do You Need To Stain Pressure Treated Wood?
Pressure-treated wood is built to last, but it doesn’t always look great. If you’re looking for a deck that will last for years to come without showing signs of wear, pressure-treated wood is a good option. However, the trade-off is that pressure-treated wood can be somewhat ugly.
It’s because the treated lumber is not 100% immune to damage from sunlight, wind, or water, causing the wood to lose its color and become dull. In addition, the harsh chemicals used to preserve the wood also give it a dull, lifeless appearance that can quickly become an eyesore.
If you’re not a fan of the look of pressure-treated wood, staining it is a great way to improve its appearance. Not only will staining enhance treated wood’s natural beauty, but it will also help protect it against surface cracking and make the wood even more durable. If you’re looking for a deck that will last for years and looks great, staining pressure-treated lumber is a great option.
Why Staining Pressure Treated Wood Is A Better Idea Then Painting?
Pressure-treated wood is treated with chemicals that help to extend its lifespan. However, these chemicals can also make it difficult for paint to stick to the surface of the wood. Though, it’s not impossible to paint pressure-treated wood. But, to do so, you need to follow the right methodology.
Painting pressure-treated wood prevents the lumber from breathing, which can lead to rot, mold, and mildew. For these reasons, many homeowners choose to stain pressure-treated wood rather than paint.
Staining pressure-treated wood is a relatively simple and straightforward process. First, clean the surface of the lumber with soap and water. Allow it to air dry, and then apply the stain of your choice. If you want to paint instead- there’s more work involved because you will need to sand the surface and apply a latex primer.
See? It’s a bit more work, right?!
How to Stain Pressure Treated Wood (Step-by-step)
To my fellow DIY enthusiasts, I must tell you something. Yes, the thought of staining pressure-treated wood may sound exhausting and tedious. But I can guarantee that if you follow the steps in this article, you’ll be able to complete the project easily. We’re here to help! In this section of the post, we’ll show you how to stain pressure-treated wood using a variety of methods. Let’s get started!
Step One: Prepare The Wood
Pressure-treated lumber is often left with additional moisture after treatment, which can lead to problems when applied for staining. To avoid this issue, you need to make sure that your boards are completely dry before applying any stain or paint.
Drying times can vary depending on climate and weather–a few weeks may be normal in warmer areas while colder regions require up to 3 months or more.
But, be sure to periodically check your wood’s moisture level during the drying time. If it becomes too dry, then you risk losing its natural ability for staining.
Basically, every day without a coating of protection is another chance for UV light in sunlight to degrade cell structure and reduce the effectiveness of future staining.
So it’s a balancing act between Drying & Not Too Drying.
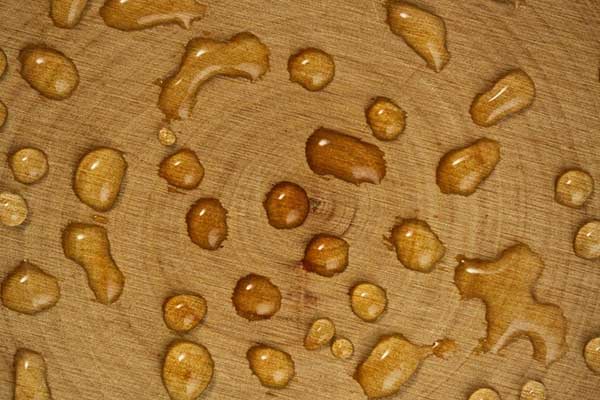
One way to check if the wood is dry is to do the sprinkle test. To do this, simply sprinkle a few drops of water on the surface of the wood. If the water beads up and stays on the surface, then the wood is still wet. If the water soaks into the wood, then it is dry and ready to stain.
Another simple method to check dryness is to press a nail into the wood. If water comes out, then the wood is still soaked and will need time to dry out.
Another way to test the moisture content of wood is to use a moisture meter. This device will give you a reading of the percentage of moisture in the wood. Generally, you want the moisture content to be below 19% before you begin working with the wood.
Step Two: Clean The Wood
Before you can enjoy the beauty of your pressure-treated wood, you need to take care of some important prep work. That means giving the wood a good cleaning before you stain it.
Otherwise, the finish may not adhere properly or may not look as smooth and even as desired.
To clean pressure-treated wood, use a gentle detergent and brush or sponge. This will remove any dirt, debris, or residue that may be on the surface of the wood.
Another way to clean pressure-treated wood is with a power washer, as this will quickly remove any loose surface debris.
When cleaning older wood, you’ll need to do a bit more work in order for the stain and grime on your deck or fence to go. Visit a nearby hardware store and find the right product specifically designed just for this task.
Step Three: Check The Weather
Before you start the process of staining pressure-treated wood, it is important to choose the right weather conditions.
Otherwise, you risk the stain not bonding properly or drying too quickly. For best results, wait for two or three days of dry weather before beginning the staining process.
Humidity can impact how quickly the stain dries, so it’s best to wait for a period of low humidity.
The third day of sunny weather? Just about Perfect-
Another thing, if the stain is applied in direct sunlight, the heat will quickly evaporate the stain. Resulting in a patchy and uneven finish. Beware of it.
Wet weather can ruin newly applied stains, so always check the forecast for rain before starting your project. Aim for a dry period of at least 24-48 hours to ensure that the stain has plenty of time to dry and set.
Once you’ve confirmed that the weather will cooperate, you can move forward with your staining project confidently.
Step Four: Choose The Correct Stain
Anyone who has ever stained pressure-treated wood knows that it can be a bit tricky. The first step is to select the correct stain. There are two main types of stains:
- Water-Based Stain – SamaN Wood Stain
- Oil-Based Stain – Watco Danish Oil Wood Finish
- Varnish Based Stain – Minwax Polyshades Stain & Polyurethane
- Gel Stain – Minwax Gel Stain
- Exterior Stain – Ready Seal Wood Stain and Sealer
Each type of stain has its own benefits and drawbacks, so it’s important to select the right one for the job.
When installing a new deck, it’s best to use oil-based stains because they fully soak into the wood and protect against water penetration. The additional protective layer shields against harmful exterior factors like UV rays.!
When it comes to looks, oil-based stains are a great way to give your PT lumber that natural, weathered look. There are many different shades to choose from, including cedar and oak for those who want something more traditional sounding. And, if you want something more vibrant, you might want to try redwood.
Like everything, it has some drawbacks too. One of the downsides to using an oil-based exterior stain is that it doesn’t last very long. You’ll need to apply a new coat of stain every year. Additionally, the oil can attract mold, mildew, and algae growth.
In contrast to their oil-based counterparts, water-based stains dry quickly and can even be absorbed by damp wood. This makes them easier for you as dirt comes right off with just soap or water!
The trouble with a water-based stain is that it gives the lumber an artificial-looking finish. It hides the natural wood grain patterns and removes its typical look that we have come to know as ‘natural.’
It’s also important to know that some manufacturers have designed stains that are specifically formulated for use on pressure-treated wood.
Step Five: Mixing The Stain
Mixing the stain is an important part of achieving a good application. You can have your hardware store do this for you, or just shake well at home and keep stirring until all lumps are gone before pouring onto the surface!
Step Six: Test Run
There is always that tempting urge to rush through a project, but it’s important not to do so.
The smart way to stain a project is by testing in a small area first.
This way, you can assess if the color or finish is right for your project before spending hours on it and confirming that everything goes well with the application.
Step Seven: Apply The Stain
Now that you have test-stained your pressure-treated wood, it is time to let the color really show. Take care not to overdo brushstrokes in any one area because this can lead to additional layers of the finish. This can also change what shade your treated wood turns out too!
When staining any vertical surface, such as a fence, it is important to start at the top and work your way down. This will ensure that any drips or runs are covered as you go.
Also, remember that the exposed ends of the wood boards will absorb more stain than other parts. So they just might need additional staining.
Factors that Determine the Dry Time of Pressure-Treated Wood
The wait time for each wood type is different. Why?
There are various factors that actually affect the dry time of treated wood. Depending on them, you have to wait from 4 weeks to 6 months longer.
Let’s see what are these factors and how to determine the right time to wait:
Type of Wood Used
Will you paint your projects right after completion? It mainly depends on what type of treated wood you are using. There are two main types of lumbers that workers use quite often in outdoor projects,
Wet treated Wood
This type of wood is treated under high pressure with lots of preservatives. As a result, moisture is stuck deep inside the wood which takes time to evaporate. If you use this wood lumber in your projects, you may have to wait for 2 to 3 weeks to dry it completely. However, in tropical areas like Florida, you may have to wait for 6months to one year to make it moisture-free. Too Long!
Kiln-dried pressure treated lumber:
This treated wood type has already passed through the kiln heat to make it moisture-free. So, it would take less time to dry. Probably two to three days under ideal environmental factors like humidity and temperature.
It’s more strong and ready to paint after purchase. However, it’s too expensive and not available for sale in retailers’ shops mostly. Despite the advantages, it’s not widely used.
Type of Paint You Want To Apply
Will you use a water-based formula or oil-based formula?
It’s important to plan what type of paint you will use before you startup. There are two types of paints available for treated wood
- Water base Formula
- Oil-based Formula
Water-based paints are easy to remove and would stand no longer. For this paint type, treated wood should be 100 % moisture-free. Because this paint itself uses water.
Oil-based formula is more durable and weather-resistant. It is recommended to use such paints on exterior projects to get long-lasting results.
However, it also depends on your budget. If you want to apply cheap paint then go on with the water-base formula. But you may have to apply it more than once. Painters often use base primer seals to make water paint last longer
Temperature In Your Area
Another factor that contributes well to determining the treated wood dry time is the weather. If you are living in the coldest zones like Canada where winter is too long, you have to wait more extra weeks to stain your wood. It may be 2 weeks to one month. But keep a double check on the wood through a repeated water test.
In dry hot areas where sunlight is easily accessible throughout the year, treated wood is likely to dry soon. In Asian countries where the summer season is too long about 6 months, dry time will be too short.
In tropical areas, it would take more time than you expected. Because frequent rain will increase the humidity factor. So, it may take more than 4 weeks here.
Humidity Level In Your Area
It’s double-checked procedure. Moisture may exist in the environment or inside the treated wood. The humidity level should not exceed 55 %.In the scenario, if moisture hits above 55%, the chances of wood getting damaged will increase. Exterior wooden frames and floorboards will swell up.
However, moisture inside the wood should be 8% to 25% depending on the humidity level outside too. It’s clear now that if the humidity level hits beyond this level you may have to wait more before starting painting.
It happens in tropical areas mostly. The best solution is to expose wood directly to sunlight as much as you can. In this way, moisture will evaporate regularly.
What Happens If You Stain Pressure-Treated Wood Too Soon
Painting treated wood early before drying is just like feeding fish more food even if it has eaten much. What happens, is the fish belly will swell up. The same happens with wood. When you stain wet wood its pores are already full of vapors, and can’t accommodate the paint moisture anymore. Still, you paint it. As a result, wood tends to swell up to accommodate extra moisture.
It may contract to its previous size when dry. However, in this swelling and contraction movement, wood will damage its originality. It will no longer retain its previous outlook. This type of damage contains cracks, splits, and blemishes on the treated wooden surface. That looks ugly even painted.
How To Determine If Pressure-Treated Wood Is Ready To Paint
There are so many opinions on how long to wait for wood before. paint. In other words, there is no exact time frame. So, workers often rely on guess games. But we have a solution to this problem.
There are two ways to determine whether treated wood is ready to stain or not. The first one is a rather simple technique that everyone can experiment with free of cost.
Do Water test: Pour clean water on a wooden piece that is expected to dry. If the water absorbs instantly, the wood is ready to paint. It means pores in the wood are ready to adhere to paint layers. If water beads up, wait for a few more days then repeat the same test to check if it’s dry or not.
Use Wood Moisture Meter: To avoid guess games, try to use technology. You can use a pin-type wood moisture meter to detect whether it is dry or not. Insert the pins inside the wooden piece and switch on the meter. Electric current will start flowing from one pin to another giving the reading on screen. That would tell you about the current water-resistant of the wood.
Should You Let Pressure Treated Wood Dry Before Staining?
Yes, of course..it is compulsory.
Woodworkers must have to wait before stain-treated wood until it dries completely. To increase the lifespan of wood, it is usually passed through certain chemicals under pressure. During this process, it is likely to catch moisture in pores. When it comes to shops for sale, it is still wet.
So, it is recommended to wait before the stain.
However, you can build your project with it. Staining should always be the last step.
You might think that your projects will take longer if you have to wait too long. Remember if you don’t wait all of your hard work may end up in no result.
Wood may lose its quality and immediate painting may result in cracks.
How Long To Wait Before Staining Pressure Treated Wood Deck
Finally, your wood deck is ready. Going to paint it…wait, read on to know should you paint it or wait for some days more.
Depending on the type of lumber used, humidity level, and moisture inside the wood, it may take 2 to 3 days to paint your deck after its build.
If you are using premium treated wood, it’s more likely to paint right after it’s done. However, wet treated wood may take a few weeks to stain.
The best way is to apply a water test or check the moisture level of the wood. If it ranges from 6% to 25% then it’s ready to paint. However, if the humidity level of your area is above 50 %, it’s better to wait for one or two extra days.
All of the hard work of the painting may result in nothing if you do it without drying it fully.
How Long To Wait Before Stain Pressure Treated Wood Fence
Wood fencing is the topmost DO IT YOURSELF activity. When you buy lumber for fencing, it’s not ready to stain immediately after purchase. It has humidity that needs to be dry off completely prior to stain. If you go on without drying it, the stain would not stand longer.
So, it’s essential to know the exact time needed to wait. Depending on factors like the type of treated lumber, humidity in your area, and the size of logs, you have to wait from 4 weeks to even 6 months before the stain. For wet treated lumber, the wait time may exceed up to 6 months. In tropical areas, the humidity level is high which prevents bigger pieces from drying out soon.
However, kiln-dried treated lumber takes less time as it is already exposed to the heat of the kiln. So, it may take less than 2weeks or more than 4 weeks depending on the humidity level in your area.
Size is another factor. Bigger pieces of 4×4 will take more time to dry than smaller ones. This is because moisture may be deep inside the pores.
The best way to tell if wood fencing is ready to paint is to apply a water test. Sprinkle water directly on the wood. If the water drops soak into the woods, it’s ready for stain. It tells that Pores are closed now to accommodate more moisture. If water beads up then wait for a few days to let it dry completely.
Best Stain For Pressure-Treated Wood
There are so many strains available in the market. However, you should do proper research prior to placing an order. To save your time, we’ve separated a few top products that you can use anywhere on deck, fence, or any exterior projects.
- DEFY Extreme Wood Stain
- Deck Solid Color Wood Deck Stain
- Thompson’s TH.042841-16 Waterseal Waterproofing Stain
- Cabot 140.0016337.007 Semi-Transparent Deck & Siding Low VOC Stain, Gallon, Cordovan Brown
- Ready Seal Oil-Based Stain
- Waterlox Original Marine Sealer
Stain Colours For Pressure-Treated Wood
Choosing the right stain for your wood is a pretty straightforward process. But know the wood type first whether you are using lumber or wood itself. For treated lumber that you use mostly for fencing, we recommend
For treated wood brown stain is the best option. It’s up to you to use any shade from dark to light. For outdoor use, darker stain stands longer. Whilst for indoors, light shades are preferable. Here’s Few stain color recommendation for treated wood
Conclusion
In the end, I would say Wait is the only option before staining pressure-treated wood. To boost the outlook of your woodworking projects, check wood moisture at first. Dry wood is relatively more stable and stronger than wet lumber. Choose wisely! Though kiln-dried treated lumber is costly yet it is worth its price. So, I would suggest not using wet wood.
Related Articles: How to remove duct tape residue from wood?
How long do you wait before staining pressure-treated wood in your Country? Share your experience with us. Godspeeds!
